Volume 2, Number 4 - April 1997
Journal of the Home Metal Shop Club of Houston, Texas.
President - John Korman, V. Pres.- Richard Drews, Treasurer - Alan May, Secretary - J.D. Wise
Editor - George Carlson, Email geotek@flex.net
General News and Events
Wow! It's hard to believe that April is already here. The last meeting was on March 15th. We had about 20 present, of that, 5 were new to the group. Membership is growing pretty well, I think everyone is pleased with the group. The Web Site is starting to generate interest from all over. John Korman tells me that he gets membership requests from all over the country. I received an Email the other day from a fellow in Australia, he was describing a mill he was working on restoring. The internet sure has done a lot to bring people of similar interests together regardless of where they are in the world.
I look forward to corresponding with more fellow metal workers in various parts of the world. We have a very special group here in Houston, now we can share our experiences with the rest of the world.
As I understand it Don has ordered the Sterling Engines kits, we should see them shortly.
Membership Information
Membership is open to all those interested in machining metal and tinkering with machines. We currently have members that have considerable backgrounds in the hobby, and other members that are just starting. The purpose of the club is to provide a forum for the exchanging of ideas and information. This includes, to a large degree, education in the art of machine tools and practices. There is a severe shortage of written information that a beginning hobbyist can use. This makes an organization such as this even more important. Please send in your dues to help keep this club in sound financial shape and continue to help more people get into this fascinating hobby. For membership information and forms, call John Korman at (713) 723-8597.
Work Holding Act II
This month I'd like to show a few simple ways to precisely hold work pieces in the lathe. All of the methods shown simply use the scroll chuck and the tailstock.
Mandrels and arbors are two devices used for workholding in the lathe. Mandrels are generally thought of as shafts that are held between centers. The tapered mandrel used for holding the gear blank back in the November issue of the newsletter is a good example. Arbors are held at one end. The word arbor comes from the Latin word for tree (if anyone cares). Common arbors are those that hold drill chucks and slitting saws. In this article I will show how to make some simple mandrels and arbors that will make your lathe work go a little faster and easier.
The photo shows the two parts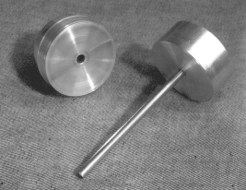 of a special mandrel for making RFT's (round flat things). It consists of a 2" diameter piece of aluminum bar, about 2" long. This is the driven end of the tool. A smaller diameter is cut about halfway along its length. This produces a step to prevent the piece from being pushed back into the lathe chuck. After the step is cut, the piece is reversed in the chuck and the front is faced. Drill a hole for the shaft to go into. This one uses a 1/4" hole, you can make any size you need. I also faced the piece slightly concave to cause it to grab more at the outside edge when the tool is being used. At this point it is a good idea to put a witness mark on the outside of the tool. I put my marks between the jaws where the chuck key socket marked with a"0" is located. This allows the tool to be placed in the chuck the same way next time it is used. The other end of the tool, (free end) is made in a similar manner as the driven end, except that instead of cutting a step on the outside, cut a 60( center on one end. The shaft can be whatever length you think you might need, this one is about 6" long. Locktight the shaft into the free end so that there is plenty of clearance between the point of your live center and the end of the shaft.
This photo shows the tool in use.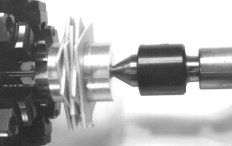 Six pieces of Plexi-Glas are being turned into circles. The pressure from the live center in the tailstock will hold the pieces in place and help keep them from spinning on the mandrel. Take light cuts to help prevent the slipping. This is a good way to make various pulleys, washers, and wheels. This works for any RFT that can have a hole in the center.
For RFT's without holes, try this.
Make a tool such as shown above, just leave the shaft out. Use a piece of self-adhesive sandpaper, stuck to the driven side. A fine grit, 220 or finer would work best. Use the free end of the tool with lots of tailstock pressure to hold the piece in place. I think a little common sense needs to be followed for speeds and feeds when using this set-up. If the cutting tool catches, it can throw the workpiece out of the lathe, so be careful!
You can make your own expanding arbors.
This technique works great for producing very accurate gear blanks and flywheels.
Making an expanding arbor is simple. It takes advantage of the tapered nature of pipe threads.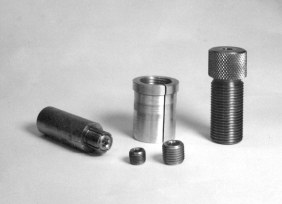 One of the arbors is shown on the left side in the photo. Also shown are two brass NPT plugs of 1/8" and 1/4" size.
Place a piece of CRS in the lathe chuck. Drill and tap for the desired NPT size. Drilling extra deep can sometimes be helpful. Now turn the outside to fit the workpiece I.D. Sometimes it is necessary to cut a groove next to the shoulder to help the arbor expand. Cut the slots using a small hacksaw or razor saw. Slide the workpiece on and screw in the pipe plug. When the plug is tightened, it causes the arbor to expand and grip the workpiece. Be sure to put a witness mark on the arbor before removing it from the chuck.  The photo shows the arbor being used to hold a gear blank while it is being profiled.
Size can be a bit of a problem when using the pipe plug method. If your work is very small you can substitute tapered pins instead of the pipe plugs. The hole should be drilled all the way through the arbor to make it easier to remove the tapered pin. It may also be necessary to hold the pin in place using the tailstock live center while machining is being done.
Mandrels and arbors are used for holding workpieces by their I.D.'s.
Collets hold on the outside of the workpiece.
A common way to machine a piece with threads on it, such as a piece of all thread, is to slit a nut, screw it on the piece, and clamp it in the chuck. This works very well, the pressure of the chuck on the nut keeps the workpiece from turning in the nut. This prevents damage to the threads. The problem with this method, however, is accuracy, or lack of it.
If you are doing precision work, make your own threaded collets. A photo 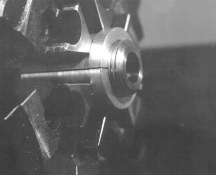 of a shop made threaded collet, and the cartridge forming die it was used to produce, are shown in the background of an earlier photo. This photo is a close-up view of the collet holding the die that is being machined. Making the collet is straight forward. Chuck up a piece of stock and cut a shoulder slightly less than the normal diameter. Cutoff the collet blank and reverse the piece in the chuck. Now bore and thread the collet blank. The shoulder is used to help index the collet and prevent it from sliding in the chuck jaws. In this case the slot cut through the side of the collet acts as the witness mark. Remember to mark the collet before it is removed from the lathe for slitting. The slot has to be cut with the collet blank out of the chuck.
Collets can be made using this technique for any weird size you might run into. I once used this method to hold the front assembly of a very expensive Schneider lens, while I machined off the engraving some bozo put around the front ring. It came out beautifully.
Next time we will start getting into some more complex holding problems.
Until then just remember - Lathes and neckties don't mix!
The Bandsaw Project
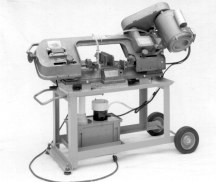
This month's project is a stand for a 4x6 Horizontal/Vertical bandsaw. Please see the Projects section of this website for details.
