Journal of the Home Metal Shop
Club of Houston,
Volume 5, Number 5 - May 2000.
President - Keith Mitchell, V. Pres.- John Lilly, Treasurer - Gordon Lawson,
Secretary - Dean Eicher Editor - Keith Mitchell: Email kmitchl@wt.net
Notes from the President
By: Keith Mitchell
In last month's newsletter, I forgot to recognize the members who volunteered
to help with The FIRST Robotics competition. Joe Williams and John Lilly
operated the lathe. Ron Blair volunteered for the power controller.
At the last meeting we appointed a committee to review our policy on
remote members. Committee members are J.D. Wise, George Marsden, and Doug
Chartier. If you have any opinion on this topic please communicate it to
one of the committee members.
Ron Blair, Art Voltz, Doug Blodgett and myself attended NAMES this year.
I managed to hook up with Ron and Art during the show. If you have the
opportunity to go this is an excellent show; well organized, good venue,
and well attended. You will have an opportunity to see what others are
doing. There are examples of some outstanding work on display. Many of
the vendors are there with their products. There are seminars both Saturday
and Sunday with speakers such as Rudy Kouhoupt and Robert Langlois. Robert
authored the Village Press book on EDM and demonstrated a low budget wire
EDM he is developing. I missed the CAD-CAM-DRO seminar but understand it
was lively. Ask Ron about the Ford Museum. I'll try to do a slide show
at the next meeting of pictures I took.
Officer nominations for the June election is in progress. The four current
officers are the nominating committee. If you are asked to run for an office
consider the benefits of the club and consider giving some of that back
to sustain it. If you would like to be considered for an office for the
coming year see one of us to get your name in the hat.
March Meeting Minutes
By: Gordon Lawson
Chips Meeting - 1:00 April 15, Collier Library. 32 present. Two new
members - Taylor Brown and Dean Moreland, Two vistors - Joshua Griswold
and Richard Pichler
1. A committee to study the policy regarding remote members was formed.
Members are George Marsden, Doug Chartier, and J. D. Wise. This committee
will develop the pros and cons of accepting remote members Tenative target
to report back to the membership at the June meeting.
2. Bill Swann demoed AutoCad 14 3D.
3. Doug Chartier showed a part made to adapt a high performance ignition
to a 1970's vintage BMW.
4. Joe Scott brought some Hardinge lathe acessories he had made toassist
him in making small parts.
5. John Alsop made some tongs in his forge and shared some construction
techniques.
6. There was a discussion on making square or hexagonal holes. The
answer was to use a Watts cutter: 3 teeth for a square hole and five teeth
for a hexagonal hole.
7. Bob Lang brought his recently completed Wobbler engine. Bob makes
his engines without acess to a mill.
8. Vance Burns reported on a knife and sword convention he recently
attended. Automatic knives seem to be becoming popular. He also discussed
the Taig ling of small machines.
Foundry Group Notes
By Keith Mitchell
The last foundry group meeting was spent completing plans for our first
pour. On Sunday I went to Tom Moore's house to mull the Petrobond. Tom
has a professional muller which handles 100# of material with no problem.
We followed the directions explicitly. The directions call for 2# or 2
pints of oil. The kit I received from Budget Casting Supply had two quart
cans of oil. Initially we added the specified two pints. The sand did not
seem to be very well bonded so we added about another pint. This seemed
satisfactory. With Tom's muller the whole process only took about 30 minutes
excluding equipment time outs.
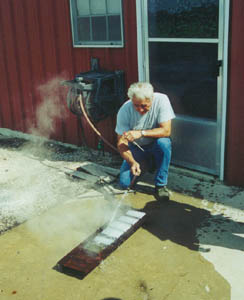
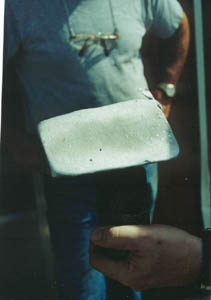
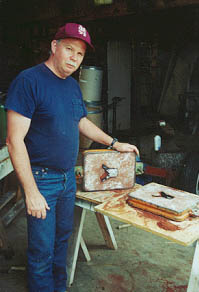
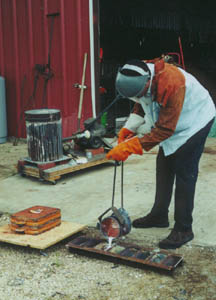
The first pour took place April 22 at Billy Hobbs shop in Hallettesville.
Five attended including Billy. <!doctype html public "-//w3c//dtd html
4.0 transitional//en">
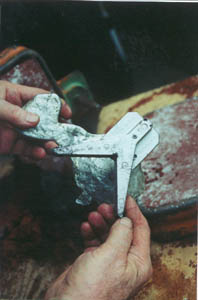
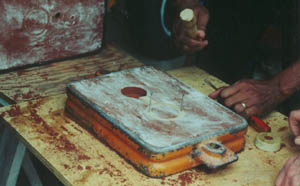
The photos below were taken during the first pour. I think everyone
was surprised at our initial success considering none of us knew a cope
from a drag at the start of the day. The first casting used a tool which
was originally die cast so there is essentially no draft to the pattern.
We were able to pull the pattern with minimal damage to the mold. and produce
a casting which with minimal machining can be a useful tool. The second
pattern poured was made by Anthony Yon. Two pieces were poured together
with a runner between the two. We all have much to learn about pattern
making but all in all the day was a success!
These pictures are from the first
pour of the HMSC Foundry Group
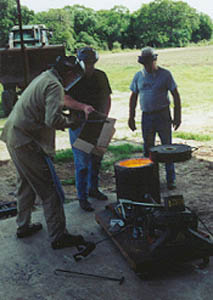
Adding scrap aluminum to the melt.
|
Cooling ingots
|
Aluminum ingot
|
Results of first mold
|
First Casting
|

Removing first casting from mold
|
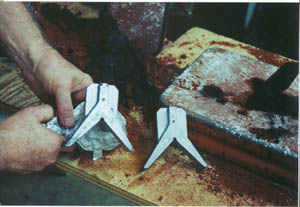
Orignal on right, copy on left
|
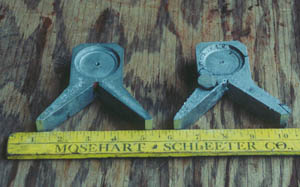
Original on left, copy on right
|
Pulling pattern from mold
|

Pouring mold
|
Pouring excess into ingot molds
|
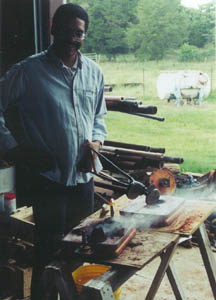
Casting removed from mold
|
Delrin
By Bill Sperry
Delrin (typically Delrin 150, or Delrin 100 Series) is a brand name
for Dupont's acetal resins. Delrin is an engineered plastic that is made
from the polymerization of formaldehyde. It provides the advantages of
plastic along with properties that are similar to metal. It is available
in black, white, and natural (tan). It is used for small parts such as
pump components, valve components, gears, bushings, rollers, and electrical
insulators.
The crystalline structure and chemical composition of Delrin provide
the following characteristics:
* Good dimensional stability and resistance to creep.
* Good chemical resistance.
* Good electrical insulating properties.
* High tensile strength, stiffness, impact resistance, and fatigue
endurance.
* Good end-use temperature range.
* Low friction coefficient
Property limits include:
* Moisture absorption.
* Limitations in repeated uses in steam or hot water.
* Limitations in exposure to strong acids and bases.
The most common processing technique used for Delrin is injection molding.
This method is used mainly in the automotive, consumer goods, and appliance
industries. Stock shapes such as bars, rounds, tubes, and plate are typically
extruded. Mechanical properties include:
* 10,000 psi Tensile Strength.
* 18,000 psi Compressive Strength (at Yield).
* 450,000 psi Tensile Modulus
* R120 Rockwell Hardness.
* 0.20 Sliding Coefficient of Friction (at 40 psi, 50 fpm)
* 0.5% Deformation at 120 deg F, 2000 psi Load, for 24 Hours.
* 5.8 x 10^5 in/hr-deg F Thermal Expansion.
* 200 deg F Long Term Maximum Service Temperature.
* 300 deg F Short Term Maximum Service Temperature.
* 347 deg F Melting Point.
* 1.42 Grams/CC Specific Gravity.
* 0.90% Water Absorption (in 24 Hours, Fully Immersed)
* 0.25% Water Absorption (in 24 Hours, at 50% Relative Humidity).
Delrin is machined using similar techniques for brass. Sharp twist drills
with a 118 degree point angle, and 10 to 15 degree lip clearance angle
will provide a good finish with a slightly undersized hole. Reaming will
improve the hole finish, but will also produce a slightly undersized hole.
Delrin can be tapped, provided the thread size is large enough. Strong
fine threads can be formed by heating a mating screw to 330 deg F, and
screwing it into the proper sized hole.
Delrin can be turned using any standard metal-working lathe. Tools should
be sharp and ground as for soft brass (a back rake to allow for free removal
of material and a large clearance to eliminate drag). Milling requires
sharp tools and proceeds as for brass. Filing is performed using deep,
single-cut, coarse, curved teeth (commonly known as a Vixen file) as is
used on aluminum and other soft materials. Delrin can be wet sanded on
belt or disc equipment. After sanding, the surface can be brought to a
high polish using standard buffing equipment.
Small parts such as washers, grommets, and non-precision gears (1/16
inch thick and less) can be produced by punching or stamping. Conventional
dies are used in either hand or power operated presses. Cracking can be
minimized by preheating the material or soaking it in water until approximately
2% moisture has been absorbed (typically 3 to 5 days of soaking).
Delrin can be glued with limited success. The bond will typically be
weaker than the base material. In selecting a Delrin adhesive, consider
both the end-use environment and the stresses that the adhesive must endure.
Adhesive joints encounter 5 types of stress (compressive, tensile, sheer,
peel and cleavage). In general, all adhesives have poor resistance to peel
and cleavage, so joints should be designed to avoid these stresses. Also,
avoid the use of butt joints.
Because of the "greasy" nature of Delrin, the surface treatment is typically
the most important consideration for a glued joint. Common surface treatments
include roughening and/or applying a primer (a solvent, or an acid). The
primer etches the material surface giving the glue something to hold on
to. Typical strength values for a bonded joint are 7000 psi with etching/primer,
and 500 psi without etching/primer. Applicable adhesives are:
* Cyanoacrylate & Primer - 770, from Loctite (800-562-8483)
* Cyanoacrylate - Permabond 268, from Permabond (800-653-6523)
* Epoxy - Lord C3135 A&B, from Lord Corp (814-868-3611)
* Epoxy - FE7004 A&B, from H.B.Fuller (800-328-9673)
* Epoxy - Fiber Resin C14, from Fiber Resin Corp (800-346-9876)
* Epoxy - EA934NA & EA9394, from Dexter Corp (510-458-8000)
* Rubber - EC1711, from 3M (800-364-3577)
Pricing for Delrin stock shapes is somewhat expensive. As of March 2000
typical pricing is as follows:
* 1/4" Round Rod - $0.54/ft
* 1/2" Round Rod - $1.50/ft
* 1" Round Rod - $5.34/ft
* 3" Round Rod - $58/ft
* 1/4" Thick Sheet - $25/ft^2
* 1/2" Thick Sheet - $57/ft^2
* 1" Thick Sheet - $106/ft^2
* 3" Thick Sheet - $375/ft^2
Picking Up an Existing Thread
By: Dick Saunders
Edited by: Joe Williams
Dick Saunders of Saunders Gun and Machine Shop picked up one of our
newsletters handed out at NAMES 1999. In that newsletter was an article
by Alan May concerning hints for beginners. Alan indicated he had difficulty
in picking up an existing thread on the lathe. Dick spent the time to furnish
the following procedure to pick up an existing thread.
First - The 60 degree threading tool must be set at centerline height
and square with the work.
Second - The compound should be set at 29-1/2 degrees.
Third - Run the lathe at speed you are comfortable to thread. Back
the tool away from the work and away from the headstock.
Fourth - With the cross slide backed off and the compound backed off
to get the tool away from the work, turn on the spindle and engage the
halfnuts at your chosen number on the thread dial. As the cutting tool
gets in line with the existing threads stop the spindle without disengaging
the half nuts. Using a very good magnifying glass (5X loupe) use the compound
and cross slide to line up with the existing thread. Set the cutting tool
to the bottom of the thread so that the tool contacts on both sides and
reset the dials on both to Zero, always move in the forward direction so
the backlash will not enter into the operation
You can now pick up the existing thread. Return to the starting point
and set the cross slide to Zero and set the compound to the desired cut
depth. Engage the half nuts at the correct thread dial location. Continue
to cut the thread the thread close to the desired size and take the final
cuts to size by advancing the cross slide straight into the thread. I use
the "three wire method" of measuring the threads and cut the last three
or so thousandths off of the threads by advancing the tool straight into
the work using the correct lubricant for the material being cut. The "Three
Wire Method" will give excellent size providing the tool is set square
to the work and the angle of the tool is sixty degrees.
