Volume 1, Number 6 - October 1996
Journal of the Home Metal Shop Club of Houston, Texas. See back page for meeting information.
President - John Korman, V. Pres. Richard Drews, Treasurer - Alan May, Secretary - J.D. Wise,
Editor - George Carlson Wk 376-4606, Hm 376-8307
General News and Events
At the last meeting, on September 21, Don Foster brought in several puzzles he had built. George Edwards showed a method of quickly mounting a small 4 jaw chuck in the lathe. Also, George showed a way to convert a boring head into a precision off-set center for the tailstock. There was some discussion of a field trip to a cast iron foundry that uses a cupola for the melting and production of cast iron. George Carlson brought in a Sterling Engine built from drawings in "Projects One".
Of Special Interest or "This Journal Needs Some Lube"
As always, we are desperately needing articles to publish in this Journal. ( I am running out of ideas.) If you would like to submit an article, idea, or photograph there are several ways this can be done. The best way to submit an article in machine readable form. A plain text file is the easiest to work with. It can be placed on a floppy and mailed to my home, or, attached to an Email and sent via the Internet. Articles and other ideas can also be faxed to my office at (713) 251-3860. This is a Spring number, and will be a toll call for most of you. If you have any photographs of projects, I would like to try to publish them here. If you have a scanner, send me the scanned image file in JPG or TIFF format over the Internet or via US mail. If you don't have a scanner, send the photo in the mail, or hand it to me at a meeting. I don't think the FAX will work well enough. If you don't have a usable photo of your project, give me a call and we'll shoot it on 4x5 Poloroid and make it look pretty. Also, mechanical drawings in DXF, WMF, CGM, or AutoCAD DWG are easy to put into the newsletter.
Membership Information
Membership is open to all those interested in machining metal and tinkering with machines. We currently have members that have considerable backgrounds in the hobby, and other members that are just starting. The purpose of the club is to provide a forum for the exchanging of ideas and information. This includes, to a large degree, education in the art of machine tools and practices. There is a severe shortage of written information that a beginning hobbyist can use. This makes an organization such as this even more important. Please send in your dues to help keep this club in sound financial shape and continue to help more people get into this fascinating hobby. For membership information and forms, call John Korman at (713) 723-8597.
JUNKYARD STEEL (It's Approximate Carbon Content)
by John Korman
        MILD STEEL                  MEDIUM CARBON
        Most scrap bars, rods,      Most shafting, tie
        angle iron, chain, some     rods, drive shafts,
        nails,* some bolts.*        frame steel, crank-
                                    shafts, piston rods,
                                    pump sucker rods,
        Nails, spikes, horseshoes   railroad spikes,
        and most bolts are low      most saws: circle &
        carbon, i.e. between        crosscut.
        mild and medium.
                                    Avoid engines valves
                                    as some are sodium
                                    filled and are very
                                    dangerous when heated
                                    or impacted.


        HIGH CARBON                 TOOL STEEL
        Coil and leaf springs,      Grader blades, plow
        wrenches, torsion bars,     points, drill steel,
        hayrake teeth, picks,       machine tools, files,
        mattocks, railroad          rasps.
        rails, axes.

        Some reinforcing rod
        is made from railroad
        rails and is high carbon
        steel.
Independent Jaws for Face Plate
Some of the most accurate turning is done on the face plate. The problem is how to fasten the work. Various bolts, washers, clips, etc. can be used. However, this is not always satisfactory. Shown in the drawing are independent jaws that could be helpful. Most of the work is done on a mill with some lathe and drill press work. Use caution and check clearance of adjusting bolt when using these jaws.
John Korman
Tapping Topics
by George Carlson
This month I'd like to dedicate much of the newsletter to the subject of Taps and Tapping. This is a subject of much interest to both newcomers and old-hands. If a person claims he has never broken a tap, he has probably never tried to use one. I will be covering the styles of taps that are commonly available and ways to make tapping a little easier and quicker.
Forms of taps
There are three general forms of taps; Taper, Plug, and Bottom.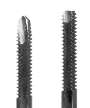 The difference in these taps is mainly in the amount of taper at the point. A taper tap has a rather long taper and will easily start straight when hand tapping. The taper extends past the first few threads allowing the tap to fit deep into the hole before any actual threads start being cut. A taper tap is usually used where hand tapping is required, and there is a danger that the tap may not start straight. Taper taps are not very common anymore, new flute designs and tapping aids have made them somewhat obsolete. They are still available, and can be quite handy if most of your tapping is done by hand. Taper taps can be used on blind holes, but they must be followed by a plug or bottom tap to produce a full thread.
Plug taps are the most common. The taper at front of a plug tap is steeper then on the taper tap. More care must be exercised when starting a plug tap, but a fuller thread is cut in blind holes. Most often, enough clearance can be given at the bottom of a blind hole, that the entire tapping operation can be done with just a plug tap.
A bottom tap can produce a nearly full thread right to the bottom of a hole. Because the taper at the point of a bottom tap is so steep, it is very difficult to start a bottom tap. Usually a blind hole is first taped with a plug tap, then finished with a bottom tap.
Styles of taps
There are many styles of taps. The picture at the right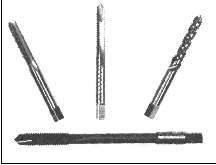 shows four different common styles.
Standard Hand Tap, Spiral Point, Spiral Flute and Extra Long Tap ( Spiral Point )
Standard hand taps are usually four or more flutes. The flutes are straight and the taper at the point is a simple design. They are generally available in all three forms. These taps are very common because they are cheap and easy to make. Most special thread size tapes are only available in this style. Standard hand taps work well in steel, but do not have much chip clearance. This is a problem in aluminum and other soft metals. Because of the small chip clearance, these taps must be rocked back and forth to break the chip and prevent clogging. They are difficult to use in power tapping.
shows four different common styles.
Standard Hand Tap, Spiral Point, Spiral Flute and Extra Long Tap ( Spiral Point )
Standard hand taps are usually four or more flutes. The flutes are straight and the taper at the point is a simple design. They are generally available in all three forms. These taps are very common because they are cheap and easy to make. Most special thread size tapes are only available in this style. Standard hand taps work well in steel, but do not have much chip clearance. This is a problem in aluminum and other soft metals. Because of the small chip clearance, these taps must be rocked back and forth to break the chip and prevent clogging. They are difficult to use in power tapping.
In my opinion, the best taps for general use in the shop are Spiral Point Taps, or Gun Taps. These taps usually have two or three flutes. The point is ground such that the chip is forced ahead of the tap. Because of this, there is no need for backing the tap up and breaking the chip. The two or three large flutes provide lots of chip clearance. Tapping aluminum is a breeze with this style of tap. The main drawback is that when tapping blind holes, the chip can get wedged at the bottom of the hole and can be tough to get out. This is the tap of choice when doing power tapping.
Thread Forming Taps
Spiral fluted taps are ground with two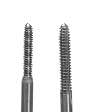 or more flutes in a right hand spiral form. This tap scoops-up the chips and carries them to the surface. This style of tap was designed for blind tapping in soft materials, but they are now available ground for hard and tough metals as well. They are expensive, but pay for themselves quickly when a lot of blind holes need to be finished.
An especially interesting type of tap is the Thread Forming Tap. This tap does not cut the metal, it rolls the thread into place by displacing metal. The resulting thread is much stronger than a cut thread. Since the metal is not cut, no chips are produced. Remember, the hole size used for these taps is much larger than normally drilled. Hole size for thread formers is larger than the pitch diameter of the thread. How much, is determined by the material, design of the tap, and final use of the part.
NPT pipe taps are designed to cut the tapered thread used with pipe. It is usually best to ream the hole with an NPT taper reamer before tapping. Depth of tapping is very critical, be sure to use something to gauge the thread as you go. Because the tap is cutting a taper, is has to cut all along its length. This can make the tapping operation very difficult. Use a very strong tap wrench when tapping an NPT thread.
Taps are available in various lengths. The Extra Length or Pulley Taps can be handy when tapping in inaccessible places. Inside a pulley is a good example.
Nut taps are a special long length tap that has a shank small in diameter than the inside of the thread. They are designed to be able to cut the threads in several nuts before having to stop and remove the nuts. The threaded nuts sit on the shank like a string of beads. Why would anyone want to do this? It is because in production it easier to remove the tap from its holder and let the nuts drop off, than it is to unscrew the nuts. This also helps prevent damage to the cutting edge of the tap when backing off the nuts. ( Same sort of damage happens to a reamer when run backwards. )
Lubricants
There are three very important rules to tapping; Use the right size hole, Use a guide to keep the Tap straight, and Use a Lubricant.
Plain oil can be used, but it will not work nearly as well as the special tapping fluids that have been developed. For aluminum, my hands-down-favorite is Tapmatic #2. I also use this for finish cuts on the lathe and mill. For steel I've tried several brands and they all seam to work pretty well. I use TapMagic, but I don't like the way it smells. There are several other brands and they probably work OK. I haven't had much luck with the waxy sticks, however. When cutting heavy threads, sulfur cutting oil works very well. Use water for plastics, kerosene for brass, and milk on copper. There have been many volumes written over the years about cutting lubricants, so information is not hard to get.
Techniques
Whether tapping by hand, or in a machine, the following steps should be taken:
Locate the hole a start the hole with a center drill.
Choose a center drill that has a pilot bit smaller than the finished hole, but a body larger than the major diameter of the thread.
Drill deep enough with the center drill to provide a chamfer for the finished hole. This chamfer will protect the threads and make the threaded hole look more professional. Chamfering after threading is bad because the countersink bruises the threads, and they may have to be re-cut.
Next drill the hole to size and depth. If you do not know the recommended size, use this formula: Hole Size = Major Size - 1/ # Threads per Inch.
In other words, a 1/4-28 would use a hole .250 - 1/28 (or .036) = .214", a #3 drill.
After drilling the hole, apply a small amount of lubricant to the hole and tap. I use an acid brush, with the lubricant held in a metal cap with a magnet in the bottom. The magnet holds the cap down, and the brush in the cap. The brush cleans the tap as it lubricates it.
Then using some sort of guide, gently start the tap into the workpiece.
The actual technique used will very with the type of material, support, and tap, but there are a couple of things to watch out for. Make sure the tap is going straight. If it is not true to the hole, it will start binding. Be careful not to put side load of the tapping handle. Concentrate on turning the handle on the axis of the tap. More taps are broken by side load than torque alone. When finished tapping, clean the chips out with compressed air ( be careful and wear safety grasses ), or a small drill bit.
 I broke a tap, now what?
This is my favorite method for removing a broken tap:
Using a small four flute solid carbide end mill, high speed, and plenty of coolant. Carefully cut the center of the tap out of the workpiece. A light touch is important, but it is easy to tell when the bit starts cutting the tap. I have removed taps as small is 2-56 using this procedure. After cutting through the tap, pick it out with a small scribe.
Tapping aids
A handy tool to make for use in hand tapping is simply a block of aluminum with a hole drilled through it just slightly larger than the body of a tap. Taps vary in diameter so you may need several holes. To use the guide, simply stick the tap through the hole in the guide, put the point of the tap into the hole to be tapped, then hold the guide against the workpiece. This will insure that the tap is started straight. When the tap has cut a few threads, back it out and set the guide block aside. Finish the hole in the normal manner.
The photo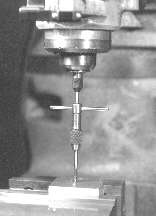 shows the use of a tapping guide in the milling machine. A tapping guide has a spring loaded plunger. The pointed end is being used in the photograph to pick-up the center hole in the back of the tap handle. Some of these guides have reversible plungers, with a hollow end to use with the pointed back end found on many of the smaller taps. In this case you would use the straight type tap handle rather than the "T" type as in the photograph.
If your milling machine has a smooth operating quill, reverse, and a good brake, you can power tap with very good results. I tap holes as small as 4-40 with this technique. Practice makes perfect. Put the tap in a drill chuck and tighten fairly tight. Do not use a keyless chuck, it will release the tap in reverse. Spin up milling machine then shut off the motor. Allow the machine to coast done a bit, then feed the tap into the work. Keep one hand on the brake. When you reach desired depth, operate the brake. To back the tap out, jog the motor in REVERSE then lift the quill gently. The tap should rise smoothly out of the hole. Works great, but takes some practice. It is a good idea to learn with 1/4 and larger taps.
Most professional shops use tapping heads. In my work, I sometimes have to tap hundreds of 2-56 holes. I have a tapping head for obvious reasons. Tapping heads offer several advantages over other methods. First, they do a good job of limiting torque, and can be adjusted over a fairly wide range. The spindle holding the tap is floated so as to help align the tap with the hole and prevent stress on the tap. The spindle also operates a clutch mechanism that stops the taps rotation. The clutch disengages when the tap pulls itself into the work further than the quill has moved. This allows the use of a quill stop to control the depth of tapping. The neatest feature is the automatic reverse feature that is engaged when the spindle is lifted. The tap is not only driven in reverse, but at 1.7 times the spindle speed. This really speeds up the tapping operation.
Another type of tapping guide is shown in this photo.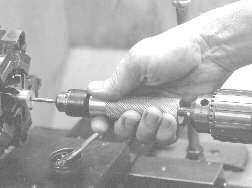 (Check out the projects section for construction plans) Also, notice the acid brush and the small cap used to hold tapping fluid. This device is mounted in the tailstock chuck after the hole is drilled. The handle is free to slide and rotate on the shaft held in the chuck. To use the tool, turn on the lathe and feed the tap into the work. Hand pressure controls the torque. When the tap bottoms out, release the handle and it will spin with the work. Stop the lathe, then put it in reverse. Slight hand pressure around the handle will cause the tap to back out smoothly. All done!
Finally, the easiest solution to tapping is the PEM nut. 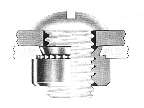 PEM is a trademark of Penn Engineering & Manufacturing Corp. These are usually used in sheet metal to provide good quality machine threads. To use a PEM nut, drill the proper size hole, deburr only on the opposite side, and press the PEM nut into place. Depending on the size of the nut, it may be necessary to use a hydraulic press. Never hammer a PEM nut, the metal will not flow, it just makes a mess.
