|
Making
a Machinist's Jack |
Often the new owner of a machine tool such as a lathe is hesitant to use the tool because he fears making a mistake and either injuring himself or breaking the tool. It is the purpose of this tutorial to show such a new user that he can use the lathe to produce a useful object without creating some sort of catastrophe.
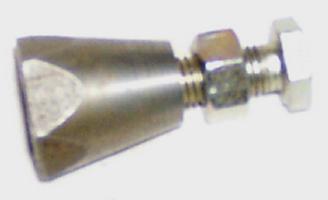
 The
machinist’s jack shown above is a simple project, requiring several
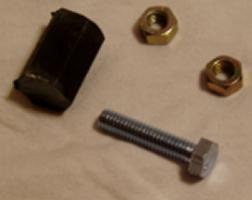
basic techniques to produce it. Materials required are:
a one inch length of ľ-in hexagonal or round steel
rod, Two 5/16 – 24 nuts, and a 1-in long 5/16
- 24 machine screw. A few tools are required.
In addition to a lathe, they include: 3-jaw chuck, tailstock
drill chuck, # 4 center drill, 5/16–24 tap with matching
tap drill, lathe cutting bit, hacksaw and a protractor.
The
machinist’s jack shown above is a simple project, requiring several
basic techniques to produce it. Materials required are:
a one inch length of ľ-in hexagonal or round steel
rod, Two 5/16 – 24 nuts, and a 1-in long 5/16
- 24 machine screw. A few tools are required.
In addition to a lathe, they include: 3-jaw chuck, tailstock
drill chuck, # 4 center drill, 5/16–24 tap with matching
tap drill, lathe cutting bit, hacksaw and a protractor.
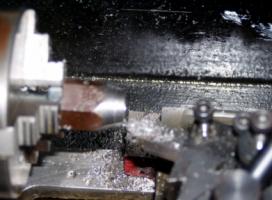
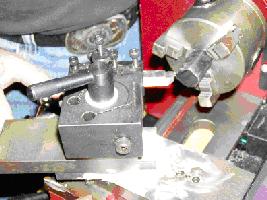 The
first set the cross slide to 30 degrees. This allows you
to determine the depth of cut easily using the calibrations
on the compound dial. On my lathe, each mark is 2 thousands
of an inch. Because we are moving the cutting tool along the
hypotenuse of a 30-degree right triangle, each mark becomes
1 thousandth. The body of the jack is chucked up in the 3-jaw
chuck and turned at the lowest speed. The compound slide
is advanced until it just kisses the face of the jack body,
then the cross slide is advanced until the tool bit reaches
the center of the workpiece. The cross slide is then retracted
until the bit is no longer in contact with the workpiece. Advance
the compound slide about 30 thousandths and repeat the cutting
operation by advancing the cross slide to the center and back.
Repeat this operations until the face of the jack is smooth. Then,
continue the smoothing process by taking smaller cuts: at 20
thou, at 10 thou, and several at 5 thou until the desired smoothness
is achieved.
The
first set the cross slide to 30 degrees. This allows you
to determine the depth of cut easily using the calibrations
on the compound dial. On my lathe, each mark is 2 thousands
of an inch. Because we are moving the cutting tool along the
hypotenuse of a 30-degree right triangle, each mark becomes
1 thousandth. The body of the jack is chucked up in the 3-jaw
chuck and turned at the lowest speed. The compound slide
is advanced until it just kisses the face of the jack body,
then the cross slide is advanced until the tool bit reaches
the center of the workpiece. The cross slide is then retracted
until the bit is no longer in contact with the workpiece. Advance
the compound slide about 30 thousandths and repeat the cutting
operation by advancing the cross slide to the center and back.
Repeat this operations until the face of the jack is smooth. Then,
continue the smoothing process by taking smaller cuts: at 20
thou, at 10 thou, and several at 5 thou until the desired smoothness
is achieved. 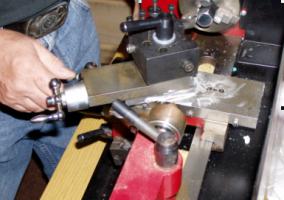
 This operation is known as facing off the
workpiece.
This operation is known as facing off the
workpiece.
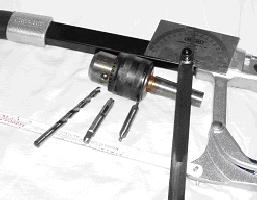
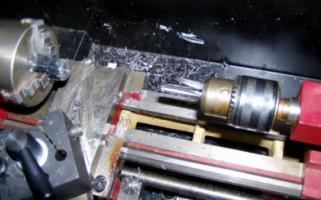
Reverse the workpiece in the chuck and face off the other end. Leave the workpiece in the chuck, and put the drill chuck in the tailstock. Chuck up the center drill and proceed to drill the workpiece by advancing the tailstock chuck into the turning workpiece with the lathe running at slow speed. By starting the hole with a center drill, the drill is fed properly to the center of the stock.
 Once
the center drill has cut into the workpiece to the depth of
the V-shaped tip, remove the center drill and replace it with
the tap drill bit. You may now drill the center hole, by running
the lathe at slow speed and advancing the drill by turning the
tailstock advance handle. It may be necessary to reposition
the tailstock in order to complete the hole. The advantage of
drilling the hole on the lathe is that it is drilled exactly
on the center axis of the workpiece.
Once
the center drill has cut into the workpiece to the depth of
the V-shaped tip, remove the center drill and replace it with
the tap drill bit. You may now drill the center hole, by running
the lathe at slow speed and advancing the drill by turning the
tailstock advance handle. It may be necessary to reposition
the tailstock in order to complete the hole. The advantage of
drilling the hole on the lathe is that it is drilled exactly
on the center axis of the workpiece.
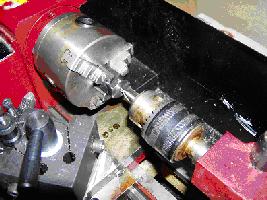
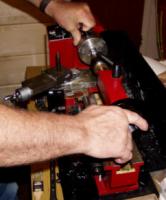 Once
the hole has been completed, it is time for the most tedious
operation in this project, tapping the center hole. This
operation is done entirely by hand, with the lathe used only
to hold the workpiece and the tap. The tap is chucked up in
the tailstock, that is advanced to the center hole in the
workpiece. Even the slowest lathe is too fast to be used for
power taping. Instead, the three-jaw chuck is turned by hand,
while the tap is slowly advanced into the workpiece. Use tapping
or cutting fluid to make the process easier. Be sure to back
out the chuck about every half turn to clear the chips. At times
turning the three jaw becomes too difficult and the chuck wrench
may be used as a lever to turn the chuck.
Once
the hole has been completed, it is time for the most tedious
operation in this project, tapping the center hole. This
operation is done entirely by hand, with the lathe used only
to hold the workpiece and the tap. The tap is chucked up in
the tailstock, that is advanced to the center hole in the
workpiece. Even the slowest lathe is too fast to be used for
power taping. Instead, the three-jaw chuck is turned by hand,
while the tap is slowly advanced into the workpiece. Use tapping
or cutting fluid to make the process easier. Be sure to back
out the chuck about every half turn to clear the chips. At times
turning the three jaw becomes too difficult and the chuck wrench
may be used as a lever to turn the chuck.
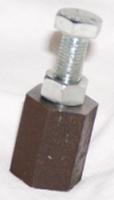
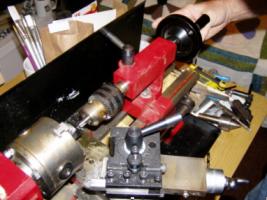
 After
the complete center hole is tapped, you have a machinist jack.
This jack, while usable is quite crude. I like to spiff
it up a little, and this gives you the opportunity to learn
a couple more techniques. The photos show a screw in the center
hole, and a jam nut on the screw. Align the faces of the
nut and screw and chuck them in the three-jaw chuck so that
the jam nut is at the end of the jaws. Screw the body of the
jack onto the machine screw until it reaches the end of the
jaws.
After
the complete center hole is tapped, you have a machinist jack.
This jack, while usable is quite crude. I like to spiff
it up a little, and this gives you the opportunity to learn
a couple more techniques. The photos show a screw in the center
hole, and a jam nut on the screw. Align the faces of the
nut and screw and chuck them in the three-jaw chuck so that
the jam nut is at the end of the jaws. Screw the body of the
jack onto the machine screw until it reaches the end of the
jaws.
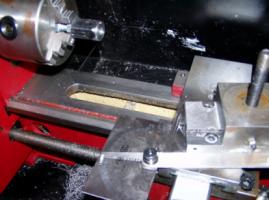
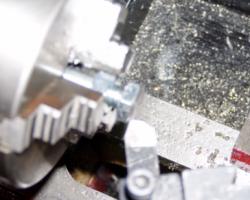
 Reset
the angle of the compound slide to 115 degrees to the cross
slide. Mount a left hand facing tool in the tool post and proceed
to cut a taper by moving in the cross slide until the too bit
just kisses the work piece, and then advancing and retracting
the compound to cut the taper. Advance the cross slide about
15 thou and repeat the cutting operation. Notice that unlike
facing, the cross slide is used to set the depth of cut and
the compound slide controls the actual cutting movement.
At first, the cut will be short, but after a few passes, the
taper will appear and can be cut to the desired length. In
this case, the taper should be cut until the top of the jack
is about the diameter of the head of the screw you are using.
Reset
the angle of the compound slide to 115 degrees to the cross
slide. Mount a left hand facing tool in the tool post and proceed
to cut a taper by moving in the cross slide until the too bit
just kisses the work piece, and then advancing and retracting
the compound to cut the taper. Advance the cross slide about
15 thou and repeat the cutting operation. Notice that unlike
facing, the cross slide is used to set the depth of cut and
the compound slide controls the actual cutting movement.
At first, the cut will be short, but after a few passes, the
taper will appear and can be cut to the desired length. In
this case, the taper should be cut until the top of the jack
is about the diameter of the head of the screw you are using.
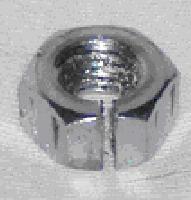
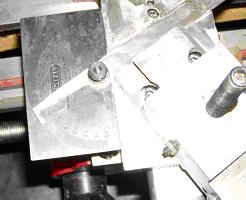
 After cutting
the taper, the next step is to make another tool, a clamp nut,
by holding a nut in a vice and cutting half way across it with
a hacksaw. The clamp nut is threaded onto the machine screw,
and then the clamp nut is chucked in the three jaw chuck, leaving
the head of the machine screw exposed so the it may be faced
off. The slit in the side of this nut allows it to compress,
providing a strong non-damaging grip on the bolt in
the three jaw chuck. The compound slide is reset to 30
degrees, and the head of the machine screw is faced off in the
same way and the ends of the jack. This completes the operation
except for the final assembly, which consists of screwing on
the jam nut, screwing the machine screw into the head and showing
off your new tool.
After cutting
the taper, the next step is to make another tool, a clamp nut,
by holding a nut in a vice and cutting half way across it with
a hacksaw. The clamp nut is threaded onto the machine screw,
and then the clamp nut is chucked in the three jaw chuck, leaving
the head of the machine screw exposed so the it may be faced
off. The slit in the side of this nut allows it to compress,
providing a strong non-damaging grip on the bolt in
the three jaw chuck. The compound slide is reset to 30
degrees, and the head of the machine screw is faced off in the
same way and the ends of the jack. This completes the operation
except for the final assembly, which consists of screwing on
the jam nut, screwing the machine screw into the head and showing
off your new tool.