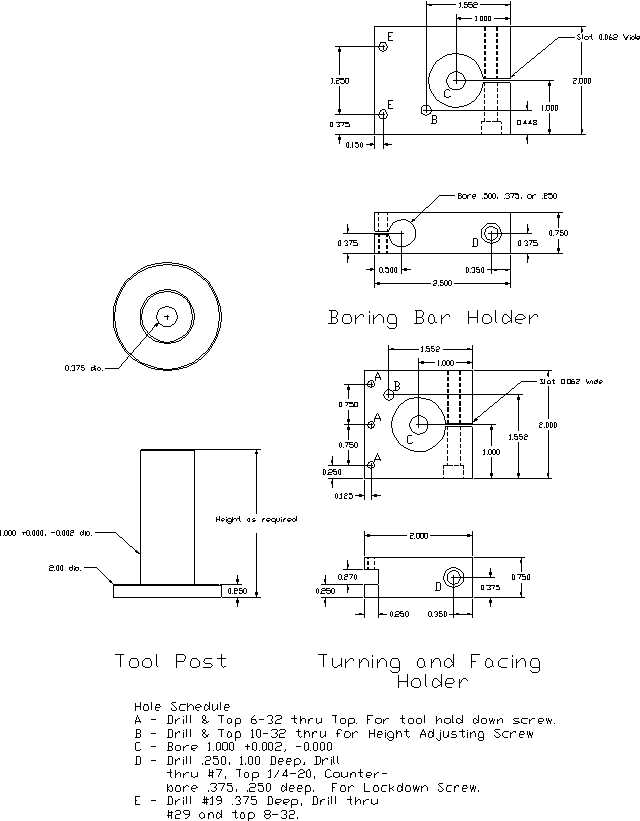
I designed and built this tool post for a 9x19 Grizzly lathe I had about 8 years ago. This is the same lathe as several suppliers such as Jet and Enco sells.
Obviously, it would be nice to have a mill, but this tool post can be built using the lathe, a drill press, and an Armstrong saw. ( hacksaw )
The post and holders are made from mild steel, I used a 3/4 x 2" bar of 1018 steel I found at Trident. The toolpost can be cut from a single 2" diameter bar, or fabricated from two pieces pressed, or brazed together. Make sure the base is solidly attached to the post, this is where the strength comes from. The diameter of the post is not real critical, but, all of the holders built for the post must fit with a light sliding fit. The height of the post should be such that the top of the post is about 3/4" higher that the lathe center. Attaching the post to the compound will depend on the lathe. My lathe did not have a "T" slot, only a post that was used for an English type tool holder. I simply machined the hole through the center of the tool post to fit the existing stud.
To make the tool holders, first cut the 3/4x2" MS stock to size. Drill and tap the 1/4" hole through the side. Next, bore the 1" mounting hole for a light sliding fit over the toolpost. Cut the slot for the 1/4" lock-down, and drill and tap the hole marked "B" in the drawing. The position of this hole is not critical. This hole is used with a long 10-32 setscrew and jamnut to set the height of the tool holder. The toolpost and holders can now be mounted on the compound for squaring-up the ends of the holder, cutting the slot for the tool, and drilling and reaming the hole for the boring bar. Use the setscrew to set the height of the holder while machining. When machining the boring bar hole, it is best to use the tailstock to supply the feed pressure. This will give a much better feed than using the carriage feed. The hole marked "A" can be drilled and tapped after the slot is cut. The holes marked "E" should be drilled and tapped before cutting the slot for the boring bar.

To use the holders, mount a tool in the holder, then square it up by eyeball, or using the chuck side or face as a reference. The turning/facing holder can be quickly adjusted to any angle for chamfering.
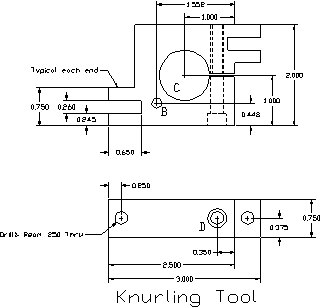
Knurling Tool Holder for Homebrew Tool Post
This is a knurling tool for the toolpost detailed in the last newsletter. It is designed to use knurls of the 3/4" diameter by 1/4" thick size. Two knurls are mounted on the holder for diamond knurling. Only one knurl is required if straight or diagonal knurling is desired. The tool is made from 3/4" x 2" mild steel bar stock. The process to make the holder is about the same as described for the other holders in the last newsletter. The slots for the knurls are not critical and can easily be cut using a hacksaw and a file. Drill and ream the holes for the knurl-axles in the lathe. This will help assure that the axis of the knurl is parallel with the lathe axis. The holes B and D are the same as in the last article. The pins for the knurl axles can be made from drill rod or dowel pins.

To form diamond knurls, install a set of knurls. At slow speed and with plenty of lubrication feed one of the knurls into the work. Go only about half as deep as needed. Turn the tool around and run the other knurl into the work. This knurl will work quickly because much of the work was done by the first knurl. Switch knurls back and forth until a pattern is created that is suitable for the project. Like many other things, this well take some experimentation and practice, the results will be well worth it.
