Volume 8, No 4 - April, 2003
|
|
Volume 8, No 4 - April, 2003 |
|
|
|
|
|
| President - |
Vice President - |
||
| Treasurer - |
Secretary - |
||
| Webmaster - |
Editors - |
||
| Founder - |
SIG Coordinator - |
Statement of Purpose
Membership is open to all those interested in machining metal and tinkering with machines. The club provides a forum for the exchanging of ideas and information. This includes, to a large degree, education in the art of machine tools and practices. Our web site endeavors to bring into the public domain written information that the hobbyist can understand and use. This makes an organization such as this even more important.Regular Meeting
 Collier Library, 6200 Pinemont, Houston, Texas, March
8, 2003, 1:00 pm. Tom Moore, President, presiding. There were 33 persons present.
Five of them were visitors: Steven Clay-machinist, Gary Shotson-machine
designer, Nolan Cecil, Harry Trawling, and Andy Catrel.
Collier Library, 6200 Pinemont, Houston, Texas, March
8, 2003, 1:00 pm. Tom Moore, President, presiding. There were 33 persons present.
Five of them were visitors: Steven Clay-machinist, Gary Shotson-machine
designer, Nolan Cecil, Harry Trawling, and Andy Catrel.
The casting group will have an event at Zube Park in two weeks.
Business Meeting
Minutes are sent via email or regular mail to club members.
Presentation
|
Doug Adams |
Moglice - Castable Bearing and Machine Tool Repair Resin |
Jim Dotson |
Our presenters were Doug Adams and Jim Dotson, speaking on Moglice, a low friction material used to repair or make machine travel surfaces. It can be cast, molded, or pumped. It was developed and is manufactured in Germany. It can repair machine ways, half-nuts, ball screws and other uses. It is based on a two-part resin and various secret additives. It is expensive but will salvage machines that no other methods can. Mr. Dotson is with RGB Industries, Inc. of Pearland, TX. They brought examples, provided literature and distributed a CD disc to each person.
The approximate percentage ingredients of Moglice are: epoxy resin 40-80, molybdenum disulphide 15-30, graphite: 10-15, aluminum: 5-10, copper: 5-10, alumosilicate: 8-15. Our club's Joe Williams found the Moglice patent on the web at United States Patent 4,329,238
.Show and Tell
|
Joe Williams showed an electric branding iron with his initials that he made so long ago it must have been in a former life. |
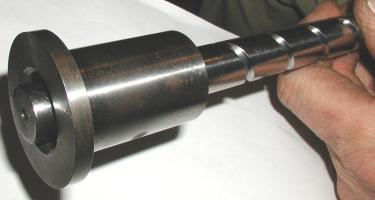
John Hoff displayed a custom built vertical slide he made for a customer to use on a lens grinding machine |
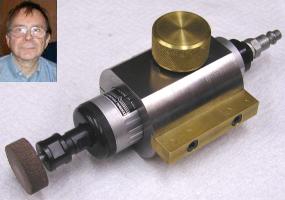
Dick Kostelnicek showed an air operated tool post grinder patterned after Jan Rowland's article. This version has a speed throttle control valve |
|
Rich Pichler made and distributed business cards and holders advertising our club to be left at various business about town. |
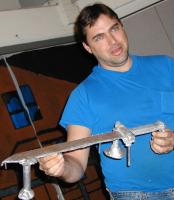
Joseph Scott showed a military gage for measuring wear in a .30 caliber gun barrel and a rear sight bracket he made for a Johnson gun. |
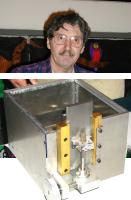
Andy Catrel displayed an aluminum sword casting just after shake-out. |
 The
Metal Casting SIG reviewed the plans for the casting workshop to be held on March 22
at Zube Park. The molding bench is in place and Ed Gladkowski is making match
plates for the railroad track frogs to be cast at the workshop.
The
Metal Casting SIG reviewed the plans for the casting workshop to be held on March 22
at Zube Park. The molding bench is in place and Ed Gladkowski is making match
plates for the railroad track frogs to be cast at the workshop.
by Dennis
Cranston
Computer Numerical Control SIG
No activity this Month.
Featured Article
Steel Hand Stamping
by
Dick Kostelnicek - HMSC Member
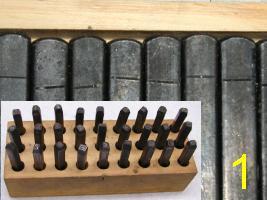
Producing a good looking alphameric stamping on a metal surface is not difficult if you keep four points in mind. First, ensure that all letter and number punch dies in your set have an orientation or witness mark so that it is difficult to accidentally set a character upside down. Second, use a massive backup or reaction plate under the work together with a vertical stop guide to aid in aligning each punch before it is struck. Third, make the stamping in two passes; a light strike of all letters, followed by a heavy final blow. Forth, enhance the overall appearance by filing-away or sanding-off the upset metal surrounding each character. Then, apply a contrast filler into the stamped impressions.
 Figure
one shows a typical set of 1/4 in. high letter stamping punch dies. Most
sets have a witness mark scribed across the shank near the end struck by a hammer.
By facing this mark toward you, the letter will be right-side-up. Don't
attempt to determine the proper character orientation by flipping the punch
and observing the die end. The character will be upside down and backwards.
Flipping it in both your hand as well as in your mind is not an entirely reliable process.
The factory witness marks on my old Craftsman stamp set, shown in Fig. 1, were just light
scratches. I had to feel the mark with my finger nail, as my sense
of touch and eye sight were not sufficient to orient a punch. As shown
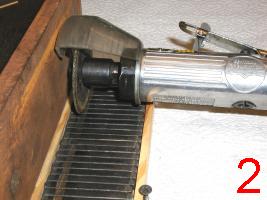
in Fig. 2, I ground in a deep wide notch in the punches with an abrasive
air driven cut-off wheel. The punches were held in a temporary wooden
tray as the abrasive wheel was passed over all punches. The resulting grove, seen in Fig.3, can easily be easily
felt as I hold each punch
with my fingers.
Figure
one shows a typical set of 1/4 in. high letter stamping punch dies. Most
sets have a witness mark scribed across the shank near the end struck by a hammer.
By facing this mark toward you, the letter will be right-side-up. Don't
attempt to determine the proper character orientation by flipping the punch
and observing the die end. The character will be upside down and backwards.
Flipping it in both your hand as well as in your mind is not an entirely reliable process.
The factory witness marks on my old Craftsman stamp set, shown in Fig. 1, were just light
scratches. I had to feel the mark with my finger nail, as my sense
of touch and eye sight were not sufficient to orient a punch. As shown
in Fig. 2, I ground in a deep wide notch in the punches with an abrasive
air driven cut-off wheel. The punches were held in a temporary wooden
tray as the abrasive wheel was passed over all punches. The resulting grove, seen in Fig.3, can easily be easily
felt as I hold each punch
with my fingers.
 If you try to hold a punch die between just two fingers,
you will not be able to line-up nor adequately space the letters unless
your are well practiced in metal stamping. Furthermore, there is a good
chance that the punch die will fly out of your grip as it is struck with a hammer.
I use a massive steel backup plate under the work being stamped. This plate
absorbs the shock, acting as a backup to the hammer strike.
If you try to hold a punch die between just two fingers,
you will not be able to line-up nor adequately space the letters unless
your are well practiced in metal stamping. Furthermore, there is a good
chance that the punch die will fly out of your grip as it is struck with a hammer.
I use a massive steel backup plate under the work being stamped. This plate
absorbs the shock, acting as a backup to the hammer strike. 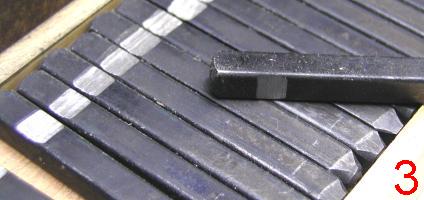 Caution!
Don't try to stamp a light weight work piece using just a wooden bench top for
support. The punch die will surly fly out of your hand when struck. The wood
table acts like a spring reflecting the energy from the blow right back at you.
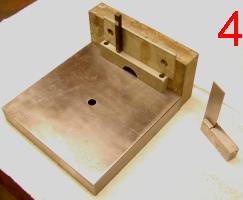
I use a 8 x 8 x 1 in. steel plate under the work, as shown in Fig. 4, to absorb and deaden the hammer
blow.
Caution!
Don't try to stamp a light weight work piece using just a wooden bench top for
support. The punch die will surly fly out of your hand when struck. The wood
table acts like a spring reflecting the energy from the blow right back at you.
I use a 8 x 8 x 1 in. steel plate under the work, as shown in Fig. 4, to absorb and deaden the hammer
blow.
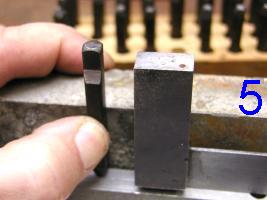
Fig, 4 also shows how I keep the line of characters straight. Each punch die is held against a vertical back support with a shim that keeps the character's distance from the work's edge constant. Prior to striking, the die is set vertical with the aid a small metal tri-square. Fig. 5 shows my thumb is pressed against the punch die, while the remaining fingers of the same hand are squeezed against the rear of the vertical support. The die, therefore, is supported mostly by the fixture rather than by my fingers. The spacing, or kerning, of the letters is accomplished by sighting along the slant face of the punch die's end near the work and moving it over just until the previously struck letter becomes entirely visible.
 Now,
I don't like to make a stamping error on a work piece that I have spent many
hours machining. Therefore, I first stamp the entire group of letters
with a light hammer blow. Then I come back resetting each punch die by feeling-it-into
the previous light impression, and then strike it with a single heavy blow.
Figure 6 shows five letters in the word STAMP. The two characters
at the right have undergone an initial light strike.
Now,
I don't like to make a stamping error on a work piece that I have spent many
hours machining. Therefore, I first stamp the entire group of letters
with a light hammer blow. Then I come back resetting each punch die by feeling-it-into
the previous light impression, and then strike it with a single heavy blow.
Figure 6 shows five letters in the word STAMP. The two characters
at the right have undergone an initial light strike. 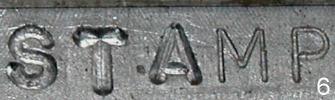 The three at
the left have had their final heavy blow. By making two passes,
you have the opportunity to correct both letter inversions and spelling errors.
You
can stamp right over the first impressions with your corrections. In the
upper part of Fig. 7, the letter "A" was initially
set upside down. After correcting the orientation, and taking the final
heavy blow, the impression is nearly fully corrected. This would have been
impossible with a single heavy first strike. As will be seen shortly,
the upset metal around the upside-down A's impression will be filed away,
thereby, removing all traces of the inverted letter mistake.
The three at
the left have had their final heavy blow. By making two passes,
you have the opportunity to correct both letter inversions and spelling errors.
You
can stamp right over the first impressions with your corrections. In the
upper part of Fig. 7, the letter "A" was initially
set upside down. After correcting the orientation, and taking the final
heavy blow, the impression is nearly fully corrected. This would have been
impossible with a single heavy first strike. As will be seen shortly,
the upset metal around the upside-down A's impression will be filed away,
thereby, removing all traces of the inverted letter mistake. 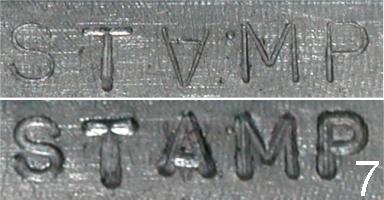
Finally, the stamping's appearance can be noticeably improved
by leveling the surface surrounding the imptession. The final
hammer blow displaces or upsets the metal from the cavity left by the die to
the surface around the letter. The volume of metal does not change. It
is just displaced. 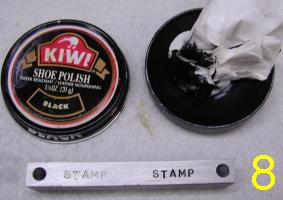 This displacement makes the metal's surface bumpy around
each letter, thereby, detracting from the crispness of the letters
and optical flatness of the metal's surface. By filing or sanding the
metal's surface flat, a great improvement in appearance is obtained. See the stamping
at the left in Fig. 8, which originally included the inverted letter "A".
This displacement makes the metal's surface bumpy around
each letter, thereby, detracting from the crispness of the letters
and optical flatness of the metal's surface. By filing or sanding the
metal's surface flat, a great improvement in appearance is obtained. See the stamping
at the left in Fig. 8, which originally included the inverted letter "A".
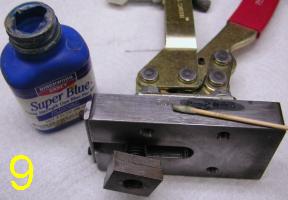
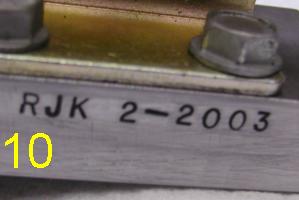
A further enhancement can be obtained by filling the impression with a contrasting color. At the right in Fig. 8, black shoe polish was rubbed into the stamping. This technique is not permanent, especially in the presence of solvents of wax. However, it is fast and dramatic. I also use this technique to freshen the graticule lines on engraved steel rules and the engravings on graduated collars attached to machine feed screws. Fig. 9 shows a permanent method of creating contrast on steel stampings. Gun blueing, available at most sporting goods stores, is applied with a cotton swab to the impression. Then, 200 grit emery abrasive paper is used to rub-away the blueing from the work surface. The result; deep dark letter impressions surrounded by a shiny flat metal surface as can be seen in Fig. 10.
 Cleaning
up the excess blueing and leveling the bumpy surface can be accomplished simultaneously
by inverting the workpiece and
rubbing it on a sheet of 200 grit emery paper. Back the paper by a flat plate and
rub in a figure-8 motion till
the surface surrounding each impression is flat. Use a light mineral
oil
lubricant such as kerosene or WD-40 to help extend the life of the enery paper
and float away the swarf.
Cleaning
up the excess blueing and leveling the bumpy surface can be accomplished simultaneously
by inverting the workpiece and
rubbing it on a sheet of 200 grit emery paper. Back the paper by a flat plate and
rub in a figure-8 motion till
the surface surrounding each impression is flat. Use a light mineral
oil
lubricant such as kerosene or WD-40 to help extend the life of the enery paper
and float away the swarf.
Bon Stamping and don't forget to put on eye protection.
|
The next meeting will be held on Saturday April 12, 2003 at the Collier Library 6200 Pinemont, Houston, TX at 1:00 p.m. Bring along a work in progress to show. Visit Our Web Site |
 |
Right click below then select [Save
Target As...]
From Netscape select [Save Link As..]
Microsoft
Word version of this newsletter 297 KB